
Ergonomics Workspace Guide.webp

The Complete Guide to Ergonomic Workspace Setup: Transform Your Home Office Into a Pain-Free Productivity Zone

Here’s the uncomfortable truth: 86% of desk workers experience back problems, and most of them think it’s just part of the job. They pop ibuprofen, complain about their aching necks, and assume that working from home means accepting daily discomfort.

But here’s what the office furniture industry doesn’t want you to know: the most effective ergonomic improvements often cost nothing and can provide relief within hours. You don’t need a $1,200 Herman Miller chair or a complete office overhaul to transform your workspace into a pain-free zone.

This comprehensive guide reveals exactly how to create an ergonomic workspace setup that eliminates pain, boosts productivity, and protects your long-term health—whether your budget is $50 or $5,000.

Professional ergonomic workspace setup showing proper posture and positioning

A properly configured ergonomic workspace eliminates pain and boosts productivity

⚡ Quick Answer: Ergonomic Workspace Setup

Essential steps: 

1) Adjust chair height so feet are flat, knees at 90°. 

2) Position screen 20-26 inches away, top at eye level. 

3) Keep keyboard and mouse at elbow height. 

4) Ensure lumbar support contacts lower back. Most effective improvements cost nothing and provide relief within hours.

Why Your Current Workspace Is Slowly Destroying Your Body

Let’s be honest about what’s really happening when you sit at your desk every day. Your workspace isn’t just causing temporary discomfort—it’s creating a cascade of health problems that follow you home, affect your sleep, and steal your energy.

The statistics are staggering: workplace-related injuries cost the economy over $50 billion annually, and musculoskeletal disorders account for 38% of all workplace injuries. But these aren’t just numbers—they represent millions of people whose quality of life has been diminished by preventable workspace problems.

The Hidden Physical Toll

When your monitor is too low, your neck cranes forward like a turtle stretching out of its shell. This forward head posture doesn’t just cause neck pain—it creates a domino effect throughout your entire body. Your shoulders round forward, your upper back hunches, and your lower back loses its natural curve.

Here’s what most people don’t realize: for every inch your head moves forward, it effectively doubles in weight as far as your neck muscles are concerned. That 10-pound head becomes a 20-pound burden when you’re constantly looking down at your laptop screen.

Your lower back suffers too. When you slouch in an unsupportive chair, the pressure on your spinal discs increases by up to 40% compared to standing. It’s like carrying an extra 50 pounds of pressure on your spine all day, every day.

The Productivity Killer You Don’t See Coming

University of California research reveals something that might surprise you: workers experiencing ergonomic discomfort show a 40% decrease in concentration ability and a 25% reduction in task accuracy. That nagging back pain isn’t just uncomfortable—it’s literally making you worse at your job.

Think about it: when part of your brain is constantly managing physical discomfort, that’s cognitive power you can’t use for creative problem-solving, complex analysis, or innovative thinking. You’re essentially working with a handicap you created yourself.

The Myth of “Getting Used to It”

Here’s what ergonomic “experts” and chair salespeople won’t tell you: your body doesn’t actually adapt to poor positioning—it compensates. And those compensations create new problems that compound over time.

When your workspace forces you into unnatural positions, your body develops workarounds. Tight hip flexors from sitting too long. Rounded shoulders from reaching for your mouse. A forward head posture from looking down at your screen. These aren’t adaptations—they’re injuries in slow motion.

The good news? Your body is remarkably resilient. Make the right changes to your workspace, and you’ll be amazed how quickly your body responds. Most people notice significant improvement within one week of proper setup.

Just like the myths surrounding standing desks (which we thoroughly debunk in our standing desk reality check), your body doesn’t actually adapt to poor positioning—it compensates.

Understanding Your Body’s Blueprint: Neutral Posture

Before we dive into solutions, you need to understand what your body actually wants. Neutral posture isn’t some rigid military stance—it’s the position where your body can function most efficiently with the least stress.

Think of neutral posture as your body’s natural alignment when everything is working correctly:

  • Your ears sit directly over your shoulders (not jutting forward)
  • Your shoulders align over your hips (not rounded forward)
  • Your spine maintains its natural S-curve (not flattened or exaggerated)
  • Your weight is distributed evenly (not shifted to one side)

Herman Miller’s research team discovered that maintaining neutral posture reduces spinal disc pressure by up to 40% compared to slouched positions. The key insight? Neutral posture should feel effortless when your workspace is properly configured. If maintaining good posture feels like work, your workspace is fighting against your body instead of supporting it.

The Reality Check: Assessing Your Current Setup

Before you change anything, you need to understand exactly what problems you’re solving. Most people have no idea how bad their workspace setup actually is until they see it objectively.

The Photo Test

Here’s a simple exercise that reveals more than any ergonomic assessment: have someone take photos of you working in your normal position from the front, side, and overhead. Don’t pose or adjust—just work normally for a few minutes, then capture your natural position.

Look at those photos honestly. Is your head jutting forward? Are your shoulders hunched? Is your back rounded? These photos don’t lie, and they’ll show you problems you can’t feel when you’re focused on work.

The Body Scan

Spend 10 minutes working in your normal position while paying attention to your body. Where do you feel tension building? Which positions feel most comfortable? Your body is constantly giving you feedback—you just need to listen.

Common warning signs:

  • Neck and shoulder tension (screen too low or far away)
  • Lower back discomfort (poor chair support or wrong height)
  • Wrist or forearm pain (keyboard/mouse positioning issues)
  • Leg pressure or numbness (chair height or depth problems)

The Step-by-Step Transformation Process

Here’s where we get practical. We’re going to transform your workspace systematically, starting with the foundation and building up. Each step builds on the previous one, so don’t skip ahead.

Step 1: Master Your Chair Setup (The Foundation)

Your chair is the foundation of everything else. Even if you have an expensive chair, it won’t help if it’s not configured correctly for your body. Here’s how to get it right:

Chair Height: Getting Your Legs Right

Adjust your chair so your feet rest flat on the floor with your knees at approximately 90 degrees. Your hips should be at the same height as your knees or slightly higher—never lower.

Here’s the test: you should feel your weight evenly distributed across your sitting bones without pressure behind your knees. If you feel pressure behind your knees, your chair is too high. If your knees are significantly higher than your hips, it’s too low.

Proper ergonomic chair setup showing correct height, lumbar support, and 90-degree angles

Essential chair adjustments for proper ergonomic support

Can’t get it right?

If your desk is too high for proper chair adjustment, you need a footrest. If your chair doesn’t go low enough, you need a different chair or desk adjustment.

Lumbar Support: Your Spine’s Best Friend

Proper lumbar support should contact your lower back at belt line height—not between your shoulder blades. It should provide gentle forward pressure to maintain your spine’s natural inward curve.

If your chair lacks adequate lumbar support, a small pillow or rolled towel can work wonders. Position it so you feel gentle support without being pushed forward uncomfortably.

Need a better chair? Check our research-backed budget chair recommendations that deliver genuine ergonomic benefits without breaking your budget.

Step 2: Perfect Screen Positioning

Your screen position determines whether you maintain neutral head and neck posture or develop the dreaded “tech neck” that plagues millions of remote workers.

Screen Height: Eye Level is Key

The top of your screen should be at or slightly below eye level when you’re sitting with proper posture. This allows you to look straight ahead or slightly downward—the natural, comfortable position for your eyes and neck.

Most laptop screens are too low, forcing you to look down and crane your neck forward. This is why external monitors or laptop stands are crucial for proper ergonomic workspace setup.

Screen Distance: The Arm’s Length Rule

Position your screen 20-26 inches from your eyes—roughly arm’s length. You should be able to read text comfortably without leaning forward or squinting.
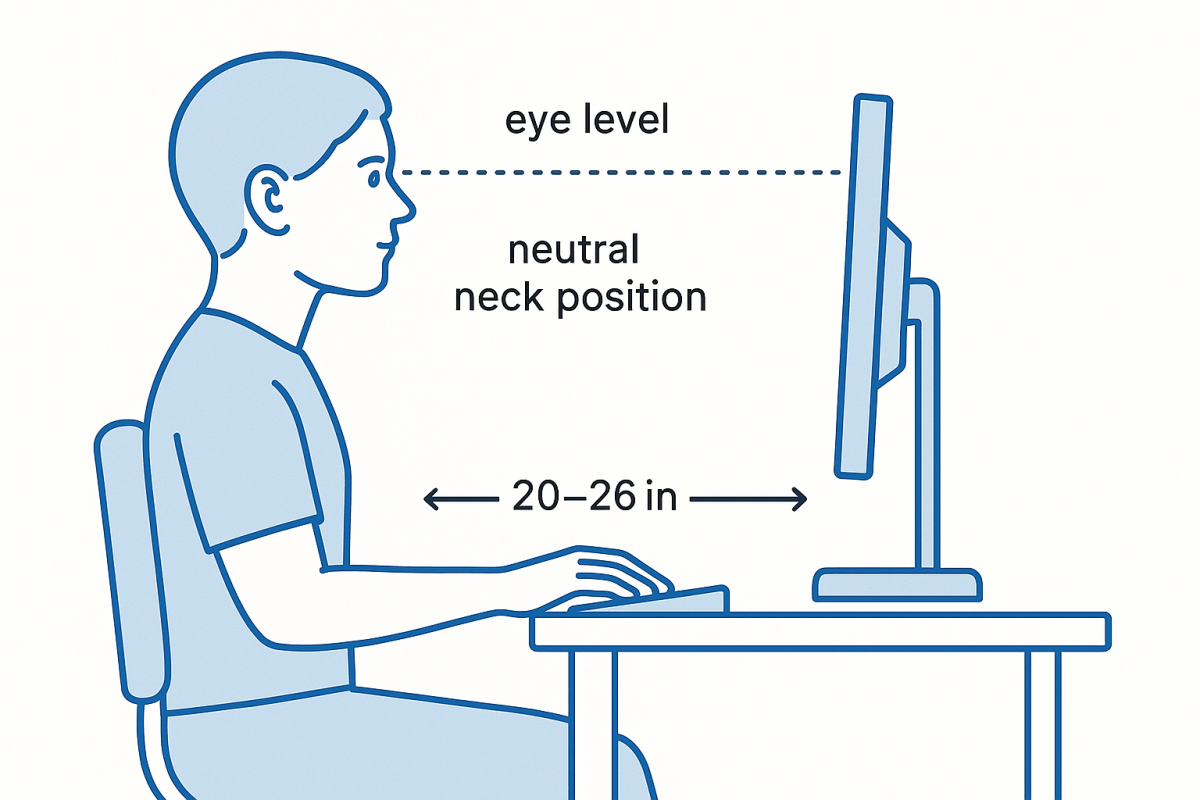
Correct monitor positioning at eye level with 20-26 inch distance for ergonomic workspace setup

Proper monitor positioning prevents neck strain and maintains neutral posture

Quick Screen Test:

Sit back in your chair with proper posture. Extend your arm toward your screen. Your fingertips should just touch the screen surface. If you have to lean forward or can’t reach, adjust the distance.

Multiple Monitors: Avoiding the Neck Twist

If you use multiple monitors, position your primary screen directly in front of you. Secondary screens should be angled slightly inward and at the same height. Avoid setups that require constant neck rotation—your cervical spine will thank you.

Step 3: Keyboard & Mouse Optimization

Poor keyboard and mouse positioning is the leading cause of repetitive strain injuries in office workers. Get this right, and you’ll prevent years of potential wrist and forearm problems.

Keyboard Height and Angle

Your keyboard should be positioned so your elbows are at approximately 90 degrees with your shoulders relaxed. Your wrists should remain in a neutral position—not bent up, down, or to either side.

Most desk heights (29-30 inches) are too high for proper keyboard positioning for average-height users. This is why keyboard trays or adjustable desks are often necessary for optimal ergonomic workspace setup.

Mouse Positioning: Same Level, Close Proximity

Your mouse should be at the same height as your keyboard and close enough that you don’t have to reach. Reaching for your mouse causes shoulder elevation and rotation—a recipe for neck and shoulder pain.
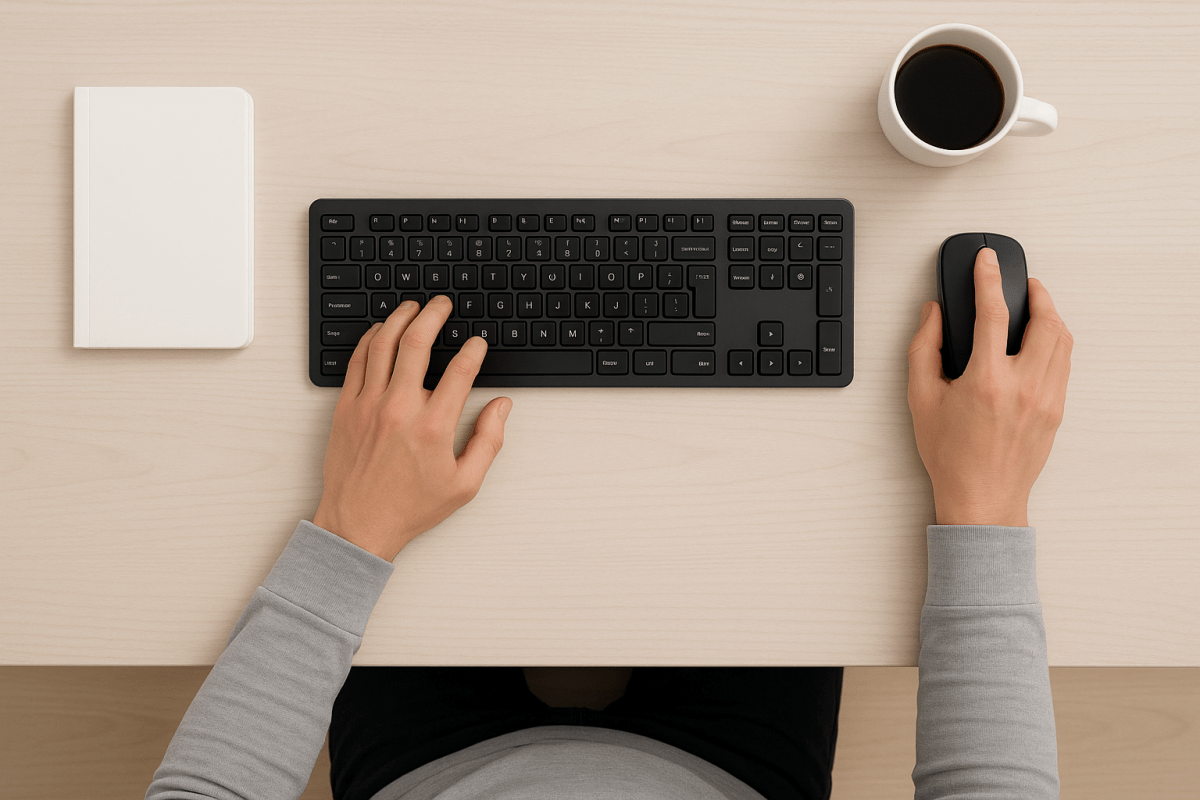
Ergonomic keyboard and mouse positioning with neutral wrist alignment and proper hand placement

Proper keyboard and mouse positioning prevents repetitive strain injuries

Wrist Rest Reality Check:

Wrist rests should support your palms during breaks, not your wrists while typing. Resting your wrists while typing can actually increase pressure on the median nerve and contribute to carpal tunnel syndrome.

Budget-Friendly Ergonomic Solutions

Here’s what the ergonomic furniture industry doesn’t want you to know: many of the most effective improvements cost less than $50—or nothing at all.

💰 Ergonomic Setup Budget Breakdown

$0-25 Budget: Use books for monitor height, rolled towel for lumbar support, adjust existing furniture positioning. $25-75 Budget: Add monitor stand ($20-40), ergonomic mouse pad with wrist support ($15-25), lumbar cushion ($20-35).

$75-200 Budget: Include adjustable keyboard tray ($40-80), document holder ($15-30), desk lamp with adjustable positioning ($30-60).

Budget-friendly ergonomic workspace improvements showing DIY solutions like books under monitor and rolled towel for lumbar support

Simple, cost-effective solutions that deliver immediate ergonomic improvements

Free Improvements That Work Immediately

  • Monitor height: Stack books under your laptop or monitor to achieve proper eye level
  • Lumbar support: Roll up a towel and position it at your lower back
  • Foot support: Use a box or stack of books as a footrest if your chair is too high
  • Document positioning: Use a clipboard or book stand to position reference materials at screen height

High-Impact, Low-Cost Upgrades

If you can invest $50-100, these upgrades provide the biggest ergonomic improvement for your money:

  • Adjustable monitor stand ($25-50): Eliminates neck strain and forward head posture
  • Ergonomic lumbar cushion ($20-40): Transforms any chair into better back support
  • Keyboard tray ($40-80): Allows proper elbow and wrist positioning
  • External keyboard and mouse ($30-60): Essential if using a laptop as your primary computer

Avoid These Common Ergonomic Setup Mistakes

Even with the best intentions, most people make these critical errors that undermine their ergonomic workspace setup efforts.

❌ Mistake #1: Focusing Only on the Chair

Many people spend hundreds on an ergonomic chair but ignore screen height, keyboard position, and lighting. Your workspace is a system—every component affects the others.

❌ Mistake #2: Making Too Many Changes at Once

Adjust one element at a time and test it for 2-3 days before making additional changes. This helps you identify what actually improves your comfort versus what feels different but isn’t better.

❌ Mistake #3: Ignoring Lighting and Glare

Poor lighting forces you to lean forward and strain to see your screen. Position your monitor perpendicular to windows and ensure adequate ambient lighting to reduce eye strain.

❌ Mistake #4: Believing Expensive Equals Better

A $200 chair properly adjusted for your body often provides better support than a $1000 chair that doesn’t fit your proportions. Focus on adjustability and proper fit over brand names and price tags.

Maintaining Your Ergonomic Workspace Setup

Creating an ergonomic workspace setup is just the beginning. Maintaining good habits and making periodic adjustments ensures long-term success and continued pain-free productivity.

The 20-20-20 Rule

Every 20 minutes, look at something 20 feet away for at least 20 seconds. This simple habit reduces eye strain and encourages micro-breaks that prevent static postures from causing problems.

Movement and Position Changes

Even the perfect ergonomic setup becomes problematic if you never move. Stand and stretch every 30-60 minutes, adjust your sitting position regularly, and incorporate movement into your workday.

Regular Setup Reviews

Review your workspace setup monthly. Take new photos, assess any developing discomfort, and make small adjustments as needed. Your body changes, your work habits evolve, and your setup should adapt accordingly.

✅ Complete Ergonomic Workspace Setup Checklist

Chair Setup:

  • Feet flat on floor, knees at 90°
  • Lumbar support contacts lower back at belt line
  • Armrests support elbows at 90°, shoulders relaxed
  • Seat depth allows 2-3 inches between knee back and seat edge

Screen Position:

  • Top of screen at or slightly below eye level
  • Screen distance 20-26 inches from eyes
  • Screen perpendicular to windows to minimize glare
  • Text size comfortable to read without leaning forward

Keyboard & Mouse:

  • Elbows at 90°, shoulders relaxed
  • Wrists in neutral position (not bent up or down)
  • Mouse at same height as keyboard
  • Frequently used items within easy reach

❓ Frequently Asked Questions

How long does it take to see ergonomic improvements?

Most people notice reduced discomfort within 2-3 days of proper ergonomic workspace setup. Significant pain relief typically occurs within 1-2 weeks as your body adapts to better positioning and muscle tension decreases.

What’s the most important ergonomic improvement for under $50?

Proper monitor height using books or an adjustable monitor stand ($15-40). This single change eliminates neck strain and forward head posture for most people, providing immediate relief from “tech neck.”

Do I need an expensive ergonomic chair?

Not necessarily. A $200-300 chair with proper lumbar support and adjustability often provides 80% of the benefit of premium chairs. Focus on proper fit and adjustability over brand names. See our budget chair guide for specific recommendations.

Should I get a standing desk for my ergonomic workspace setup?

Research shows mixed results for standing desks. A properly configured sitting workspace is often better than a poorly set up standing setup. Read our research analysis before investing in standing desk solutions.

How often should I adjust my workspace?

Make micro-adjustments weekly as you notice what works best. Major changes should be tested for 3-5 days before deciding if they’re improvements. Your body and work habits change, so your setup should evolve accordingly.

What if my employer won’t pay for ergonomic equipment?

Many effective improvements cost nothing (positioning adjustments) or under $50 (monitor stand, lumbar cushion). Focus on high-impact, low-cost solutions first. Document any work-related discomfort and present a business case showing productivity benefits.

Can ergonomic workspace setup help with existing back pain?

Proper ergonomic setup can significantly reduce workplace-related discomfort and prevent worsening of existing issues. However, persistent pain should be evaluated by a healthcare professional. Ergonomics is prevention and comfort improvement, not medical treatment.

🚀 Your Next Steps

1. Start with the basics: Implement the free positioning changes today (chair height, screen position, keyboard placement).

2. Identify your biggest pain point: Neck strain? Focus on monitor height. Back pain? Prioritize chair setup and lumbar support.

3. Explore specialized guides:

4. Track your progress: Take before and after photos of your setup and note pain levels. Most people see significant improvement within one week of proper ergonomic workspace setup.

5. Maintain good habits: Remember the 20-20-20 rule, take regular movement breaks, and review your setup monthly for continued optimization.

Transform Your Workspace, Transform Your Workday

Creating an ergonomic workspace setup isn’t about buying expensive equipment—it’s about understanding how your body works and configuring your environment to support natural, healthy positioning.

The improvements you make today will compound over time. Better posture leads to less pain, which leads to better focus, which leads to higher productivity and job satisfaction. You’re not just improving your workspace—you’re investing in your long-term health and career success.

Start with the free adjustments, invest in high-impact improvements as your budget allows, and remember that consistency matters more than perfection. Your future self will thank you for taking action today.

Ready to dive deeper into specific aspects of your setup? Explore our specialized guides on budget-friendly ergonomic chairs and the truth about standing desks to make informed decisions about your workspace investments.